
en:pattern_tutorial:blk_m_t_shirt
BLK M.T.shirt
The steps below are detailed for the V7.0 version. If you are using V6.0, the steps will be slightly different.

- Open Pattern Design software and create a new file, then click the menu [Options]-[Preference], select the unit (in/ cm / mm) you need.
- Draw the back piece first: Select the
 rectangle tool, left-click the desired location, drag the mouse to draw the rectangle, then you can view the rectangle and enter the values as needed (You can use the “Tab” key to move the cursor to the next column). After you finish entering the value, you can click the blank position or press the “Enter” key to confirm the drawing.
 - Use
 parallel line tool to draw the under underarm line:
 - Use
 Add Point to Segment tool to draw the neck width point:
 - Move the A point to be the back neck drop point: use the Pointer tool to select point A, hold down the Ctrl+Alt (Windows) or Command+Option (Macintosh) key, and click the Pointer icon
 to open the dialog box. Enter the value and click the [OK] button.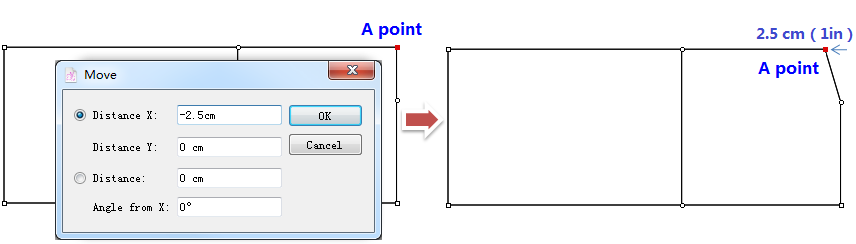
- Draw the shoulder line:
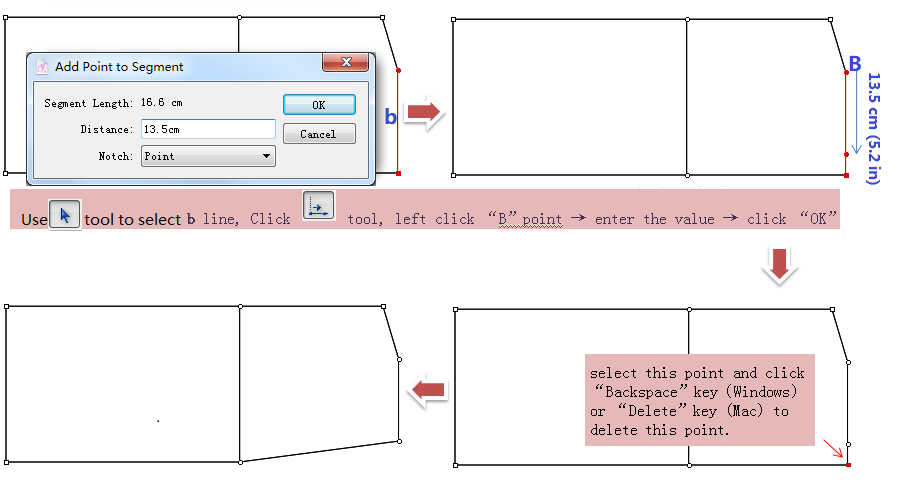
- Use
 Segment Angle tool to draw the shoulder line angle:
 - Draw the across back line:
- Use
 Curve tool to curve the neck line and armhole.NOTE: If the curve is not smooth enough, pls add more points on the curve by using the Add Point Tool to adjust the curve.
 - Delete the needless guides after you finish drawing the back piece, and copy it to draw the front piece. Note: how to copy: use to select the back piece, press Ctrl+C (Windows) or Command+C (Mac) to copy the selected piece, then press Ctrl+V (Windows) or Command+V to paste the piece.
- Draw sleeve. Use Rectangle tool to draw a rectangle first:
- Use the Pointer tool to move point E to set the sleeve top.
- Click the Pointer tool, select point E, press and hold down the Ctrl+Alt (Windows) or Command+Option (Macintosh) key, and then click the Pointer icon to open the dialog box. Enter the value and click the [OK] button.
- Use
 Segment Length tool to make the cuff width,
 - Use
 Divide Segment tool to divide the sleeve top line into 4 parts:
 - Use
 Align Two Point in Y tool to align point G to point g, align point H to point h:
 - Turn point G and H to control points: select the points and then click [Treatment] - [Points] - [Control]
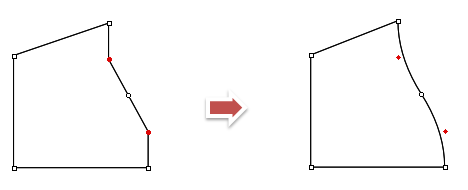
- When you finish the above steps you can use
 Segment Sync and
  Walking Piece tool to check the patttern.
- Finally use
 Mirror tool to unfold the pieces into complete pieces.


en/pattern_tutorial/blk_m_t_shirt.txt · Last modified: by administrator