
This is an old revision of the document!
Table of Contents
> The Automatic Marker menu is available in Marker Design if the nesting engine is installed (PAD AutoMark, PAD Estimate, Shape Shifter or Nester).
NOTE
Nesting Engine includes: PAD AutoMark, Shape Shifter, Nester, PAD Oline Nesting.
[Automatic Marker] Menu includes:

NOTE
The icons of the files saved from manual nesting and automatic nesting are different because of the nesting method:

Monitor
Monitor works nonstop for user: nest and save marker file automatically.
User can preset nesting job by monitor. After click [Start] button, the system start nesting the files in order and save the result.


* How to pre-set job by usingbutton:

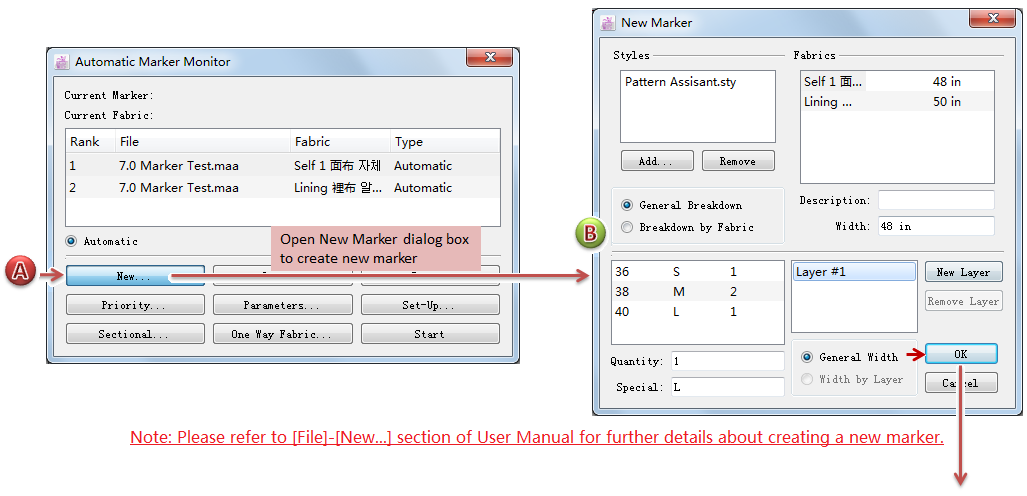
- How to pre-set job by using
button:


Automatic…
This item allows user to place the pieces on the Fabric Simulation Area. It includes two nesting functions: Rugular and Sectional, they will be introduced later.
Setting as desired before start automatic nesting:
* Time for Automatic and To Place in Automatic(Menu: Option-Preferences-Automatic Engine)
* Desired parameters (Menu: Option-Preferences-Parameters): Rotation,Symmetry,Fine Rotation, Gap and Overlap.
* Spacing between pieces (Menu: Options-Spacing);
* One Way Fabric (Menu: Options-One Way Fabric)
* Folded and Tubular (Menu: Options-Folded and Tubular)
* Plaid and Stripes and Matching (Menu: Options-Plaid and Plaid and Stripes) and Menu: [View]-[Link Pieces]
Regular
After setting the parameters:
- click [Automatic Marker]-[Automatic]-Regular in V6.0;
- click [Automatic Marker]-[Automatic], a dialog box appears and select “Regular”, and then click [OK] button.
Then system start regular automatic nesting, place the pieces automatically to simulation area and creates the marker considered as the most efficient one.


Finish nesting, the marker file can be checked and saved.
How to run Auto nesting V8.0
Step 1. From the menu bar, select Auto Nesting > Automatic

step 2. then choose your preferred nesting engine. Two engines are available: Built-in (self-contain) and Online Auto nesting.

Step 3: The preview behaviour differs by engine:
Built-in: A real-time preview of the nesting process is displayed throughout the operation. Once complete, a “Completed” marker will appear on the working area.
Online: A real-time preview of the nesting process is displayed below the Nesting List. You can also choose to show the “Completed” marker on the Nesting List.
Built-in Auto nesting:

Online Auto nesting

Sectional
The fabrics bought from market may be with flaws like color difference. In order to avoid the problem caused by color difference, user can place pieces by using Step Marker or Color Shading.
* Step Marker: In Step Marker, pieces are sorted by sizes and bundles to create sections by default. Each section has a rank to establish the order in which it is placed on the marker.
* Color Shading: In Colour Shading, pieces are sorted by sizes and bundles to create sections by default. Each section has to choose the zone which it is placed on the marker.
Options in Step Marker :

Example:


Options in Color Shading:

Example:


Similar Marker
The Similar Marker in the Automatic Marker menu enables user to create a new marker by using the current marker.
Similar Marker Dialog Box Introduction:

Example:


Marker by Reference
This function enables user to create a marker based on other markers with similar characteristics. Through this function, the system finds the similar finished marker file from specific disk partition (e.g. C/D/F), or a certain file folder, as a reference, to finish current new marker.
Marker by Reference Dialog Box:

Example:

